My self hosting setup
I have always wanted a way to organize my personal files and access them from anywhere. I am talking about a massive digital hoarding situation (tons of photos, home videos, random documents, and half forgotten pet projects). Honestly, I have been putting off dealing with this mess for years.
I did try running a self hosted Nextcloud instance in the cloud once, but the cloud costs quickly got out of hand between the storage space and the CPU/memory requirements (PHP is not exactly lightweight). So, I decided to build my own self hosting setup instead. It is cheap, secure, and mostly runs itself.
This post outlines the architecture and provides the core configuration snippets so you can build something similar.
The Architecture: A Proxy, a Tunnel, and a Home Lab
My setup has three core components:
- A Lightweight Remote Proxy: A tiny cloud server that acts as the public facing entry point.
- A Secure SSH Tunnel: The encrypted link between the cloud and my home.
- A Local Docker Server: My home machine where the actual services run.
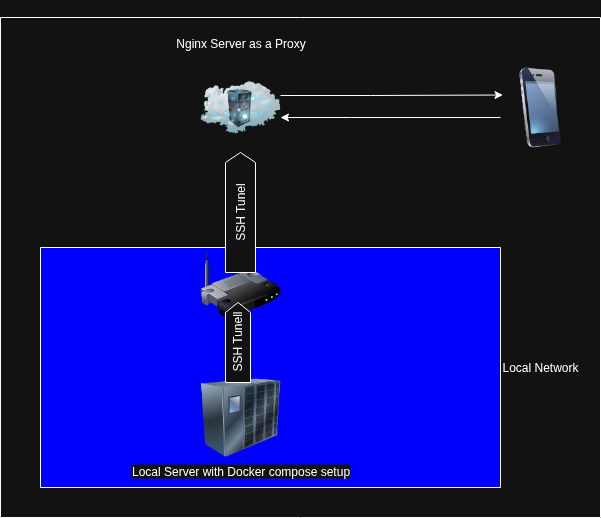
1. The Lightweight Remote Proxy
For the brains of the operation, I decided to fully automate the server creation process using Terraform and cloud init. The basic server provisioning works perfectly, though the parts related to SSL certificates and the Let’s Encrypt certbot still need a bit of fine tuning.
As I have metnitoned, I used Terraform to define the entire remote setup.
resource "hcloud_server" "proxy" {
  name        = "reverse-proxy"
  image       = "ubuntu-24.04"
  server_type = "cx23"
  # ...
  user_data = templatefile("${path.module}/cloud-init.yml", {
    domain_name = var.domain_name
    # ...
  })
  # ...
}
The real magic happens with cloud init, which provisions the server on its very first boot. It installs NGINX and sets up a reverse proxy configuration. I wanted to use wildcard subdomains (for example, if my root domain is example.com, the subdomain could be something like *.local.example.com) to dynamically route requests to my local services. This NGINX config extracts the subdomain and uses it to redirect traffic directly into my SSH tunnel on port 8081.
Here is the key snippet from the NGINX configuration that I deploy via cloud init:
# Remote NGINX: Redirects subdomains to the tunnel
server {
    listen 80;
    server_name *.${domain_name};

    set $subdomain "";
    if ($host ~* "^(.*?)\.${domain_name}$") {
        set $subdomain $1;
    }

    location / {
        return 301 http://$host:8081/$subdomain/;
    }
}
For example if I want to have self host gitea instance, a request to “gitea.local.example.com” is instantly translated into a request to “http://gitea.local.example.com:8081/gitea/”, which points directly at my home setup.
2. The Secure Tunnel: The Encrypted Highway home
With the remote proxy ready, I needed a secure way to connect it to my home network without exposing a bunch of ports on my firewall. A reverse SSH tunnel is the perfect tool for this. I wrote a simple script, start_tunnel.sh, that uses autossh to create a persistent and self-healing connection.
autossh -M 0 -f -N \
    -o "ServerAliveInterval=60" \
    -o "ServerAliveCountMax=3" \
    -o "ExitOnForwardFailure=yes" \
    -i "$expanded_key_path" \
    -R "$TUNNEL_PORT:localhost:$LOCAL_GATEWAY_PORT" \
    "$REMOTE_USER@$SERVER_IP"
This single command creates an encrypted highway from port 8081 on the cloud server to port 8081 on my local machine. It gives me incredible peace of mind knowing my home network is not wide open to the internet. Note that through this setup, I am able to safely SSH into my local server from the proxy server. The proxy server is publicly available and exposes the SSH port, but it only accepts connections from someone holding the correct private key. The corresponding public key is securely added during the initial server creation.
3. The Local Powerhouse: My Docker Home Lab
This is where the fun happens. On my local machine, I run all my services as Docker containers. My docker-compose.yml is the heart of my home lab, defining services like Jellyfin and Immich to handle my photos and videos. The final piece of the puzzle is a local NGINX container that acts as the “traffic cop” for my home lab.
It listens on port 8081, catching all the traffic from the SSH tunnel. It then inspects the request path and proxies the request to the correct service container.
server {
    listen 80;
    # ...

    # Route /jellyfin/* to the Jellyfin container
    location /jellyfin/ {
        proxy_pass http://jellyfin:8096/;
        # ... proxy headers
    }

    # Route /photos/* to the Immich container
    location /photos/ {
        proxy_pass http://immich-server:2283/;
        # ... proxy headers
    }
}
Final Thoughts
The setup is not completely finished and needs a bit more work, particularly around monitoring and automation. For monitoring, I am planning to harden the public facing NGINX server in the cloud to block scanning bots, set up centralized log collection, and configure some basic alerting. All things considered, putting this entire system together was much easier than I originally expected.